
Everyone strives to improve and have the best photos possible for their listings.
A few different shops were willing to share with me their photos from when they started on Etsy along with their current product photos. Let's see what we can learn from their photos!
Props vs White Background
 If you look at many web-sites that sell product such as Amazon, IKEA, Old Navy, etc., so often you see the product only on a white background as their main photo. Why do they do this? There's no confusion as to what is included.
Props can be both beneficial as well as a deterrent. Customers may love the prop more than your item shown and go wandering off looking for something else to buy. On the other hand, a prop can add to the beauty of your product, therefore creating a sale!
 Jill's jewelry is always photographed with a unique background, making quite a statement with her jewelry!
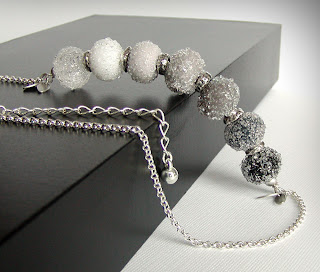
Up Close and Personal
 So you want to capture the detail in you product but when you click, you get a blurry product and clear photo. Back up a little. Every camera has a limit as to how close to the product you can really get. If you get too close, your background will be clear, product will be blurry, and well, it's just not going to be the most appealing photo for your customer to look at. If you need to, you can always crop out any unwanted space when you go into your editing program. In this way, you can control what you are bringing attention too, whether it's a portion of your product, or if you want to see the entire piece. Remember, etsy does crop the thumbnails some, so you don't want to crop too close to you item.


Play around with your lighting. Light reflects differently off one product compared to another. Play with your lighting to get it just right. Too much light in one spot can leave blown out spots, while too little in another area leaves it dark and unevenly colored.


Try different angles from the sides, light from the top, and if you have capability, even from the bottom. For glass and crystal products, diffusing the light is a good idea to avoid glare on the products. You can purchase lights that are covered, or use a light box to filter the light through. Janet captures the different cuts and shapes of her jewelry very well with her lighting setup.
Can I really get pictures like that?
With time and practice, you can improve your photos. Just remember, if you can't get it to look just right with props, then do the white background for now. Practice with props when you have time and something eye catching will happen!
As far as the close photos, try stepping back a foot and then cropping the photo in your photo editing software to enlarge what you're wanting to be seen most.
To purchase photography light boxes and lighting, check out different camera shops like Henry's or B&H.
This blog post is brought to you by Crystal of Crystal Gayle Photography, home of product photography (for the times you don't feel like shooting your own product), as well as photography prints to accessorize your home.
A few different shops were willing to share with me their photos from when they started on Etsy along with their current product photos. Let's see what we can learn from their photos!
Props vs White Background

Props can be both beneficial as well as a deterrent. Customers may love the prop more than your item shown and go wandering off looking for something else to buy. On the other hand, a prop can add to the beauty of your product, therefore creating a sale!

Up Close and Personal


Janet's jewelry is photographed up close to allow you to see the detail and beauty of each uniquely created piece.
Lighting

Play around with your lighting. Light reflects differently off one product compared to another. Play with your lighting to get it just right. Too much light in one spot can leave blown out spots, while too little in another area leaves it dark and unevenly colored.

Angel's bath and body products are photographed with a nice equal balance of light keeping everything equally lit and the white, well, white.

Try different angles from the sides, light from the top, and if you have capability, even from the bottom. For glass and crystal products, diffusing the light is a good idea to avoid glare on the products. You can purchase lights that are covered, or use a light box to filter the light through. Janet captures the different cuts and shapes of her jewelry very well with her lighting setup.
Can I really get pictures like that?
With time and practice, you can improve your photos. Just remember, if you can't get it to look just right with props, then do the white background for now. Practice with props when you have time and something eye catching will happen!
As far as the close photos, try stepping back a foot and then cropping the photo in your photo editing software to enlarge what you're wanting to be seen most.
To purchase photography light boxes and lighting, check out different camera shops like Henry's or B&H.
This blog post is brought to you by Crystal of Crystal Gayle Photography, home of product photography (for the times you don't feel like shooting your own product), as well as photography prints to accessorize your home.
Great idea for an article, Crystal!
ReplyDeleteI appreciate the input on photographing our pieces. My biggest challenges are depth and contrast.
ReplyDeleteThanks for the information!
ReplyDeletebeautiful info... i have always admired the photos of the stores mentioned :)
ReplyDeleteCrystal, terrific tips. You've shared a few with me before and I do back up now. Thank you.
ReplyDeleteawesome Job
ReplyDeleteFantastic tips
ReplyDeleteThis is a great article. I read every word and enjoyed it immensely.
ReplyDeleteLove your great tips... keep them coming - I know photos are my downfall in my shop!! Thanks Crystal
ReplyDeleteGreat information, Crystal. You are always so generous with your tips and help. I've a piece to photograph today. I think I will play with my lighting a bit more.
ReplyDeleteThanks for the motivation and suggestions.
Great post! Thank you for the information!
ReplyDeleteGreat tips! I have tried stepping back for close photos and they come out much better. Still working on getting better lighting. Thanks Crystal.
ReplyDeleteGreat tips! I have tried stepping back for close photos and they come out much better. Still working on getting better lighting. Thanks Crystal.
ReplyDeleteSome great info sharing this with some others!! :0)
ReplyDeleteUnique Cozy Treasures - Enjoyed the information. Thanks!
ReplyDeleteThank you for such great information.
ReplyDeleteFantastic tips! :)
ReplyDeleteExcellent tips and great use of photos for examples....thank you! Gracias!
ReplyDeleteGreat photography tips here! Thanks so much for sharing! *Ü*
ReplyDeleteGreat advice thx. I need all the help I can get :)
ReplyDeletegood tips, thank you for sharing
ReplyDeleteI have always found your photography tips helpful. Thanks for helping us "keep it fresh".
ReplyDeleteWhat a great resource! Thanks and more power to you.
ReplyDelete